Paddle Maintenance – Stuck or Sticking Shaft
Stuck Adjustable Shaft
Typically Adjustable Shafts get Stuck for one of Two Reasons:
- Not separated and cleaned frequently (and possibly tuned if it is starting to get difficult to insert – see below). If used in saltwater, the shaft needs to be separated and cleaned after each use. In fresh water, it still needs to be separated and cleaned weekly. “Scaling” can build up on the male side of the shaft where it inserts into the other half. This can happen over time even with diligent cleaning after each use, depending on the hardness of the water, or fine silt content present in the water, so be wary if you shaft is starting to become difficult to insert/adjust – see below for instructions how to “tune”
- A piece of sand or grit got lodged in between the shafts when assembled. Since the fit has a tight tolerance, even one piece of grit can get jammed and cause the shaft to become locked. Typically you can feel this when assembling and should stop and clean the two halves. If you continue to insert the shafts through force the shafts pieces can become locked and very difficult to remove.
How to Unstick the Shafts
To “unstick” the shafts, apply mechanical force. Sometimes, two people are required, each holding one half of the paddle shaft and pulling while twisting. Be extremely cautious when handling the blade, as it’s sturdy in one direction but can break if twisted backwards. Ideally, each person should only grip the shaft.
Some individuals have achieved success by using hot water or a hair dryer to warm up the locker and shaft area, aiding in separating the two halves if scaling is the issue. However, excessive heat can damage the shaft, so if using a heat gun, exercise extreme caution.
If the shaft has been stuck for a long time, especially because of scaling or saltwater, it might be really hard to separate it. Sometimes, I use a hydraulic jack to try to free stuck shafts, but occasionally, the shaft breaks before it comes apart. This has happened with new shafts left together while used in saltwater for six months.
This is the case for all brands of adjustable shafts, not just Braca.
Once you unstick the shaft, if you do not have a smooth assembly, then you may need to follow the instructions below to tune the shaft.
Sticky or Too Tight Adjustable Shaft
What to Do With a Sticky Shaft
For shafts that are sticky, gritty, too tight, or just recently unstuck follow these instructions to sand (tune) the shaft.
The male part of the shaft just needs to be “tuned”, or lightly sanded. If the shaft starts to become difficult to insert, and/or adjust, often “scaling” has built up on the male side of the shaft where it inserts into the other half. This can happen over time even with diligent cleaning after each use – depending on the water hardness or fine silt in the water.
Often the scaling/dirt can be removed with just some soap/Windex and a cloth and a little scrubbing. Sometimes even a soft scrub pad can be used. Be sure to clean the inside of the shaft as well (locker half)
If this cleaning does not allow the shaft to move freely as it is inserted, most likely the male part of the shaft just needs to be “tuned”, or lightly wet sanded. Best to lightly wet sand with 320g automotive sandpaper (black sandpaper that you can use wet). I use a bucket with some soapy water, dishwashing soap works fine, and keep the paper and shaft wet.
Sanding (Tuning) the Shaft
The process is not difficult, just a bit tedious. I usually take a few strokes each way, rinse off in the bucket, then insert into the other shaft to see how the fit is. Sometimes it takes only a few passes, sometimes it may take more (mixing with some 220g). You will want the shaft to be snug, but loose enough so you could just about pull it out with 2 fingers squeezing the shaft.
Be Cautious! Work slowly and check the fit frequently! You still want a snug fit!
If the shaft connection gets too loose, the looseness will cause the locker to fail from flexing – reason you need to check the fit frequently. You do not want to make the shaft too loose. After finishing, ensure you thoroughly rinse both parts of the shaft to remove any scaling or carbon grit leftover from sanding.

Sanding Shaft
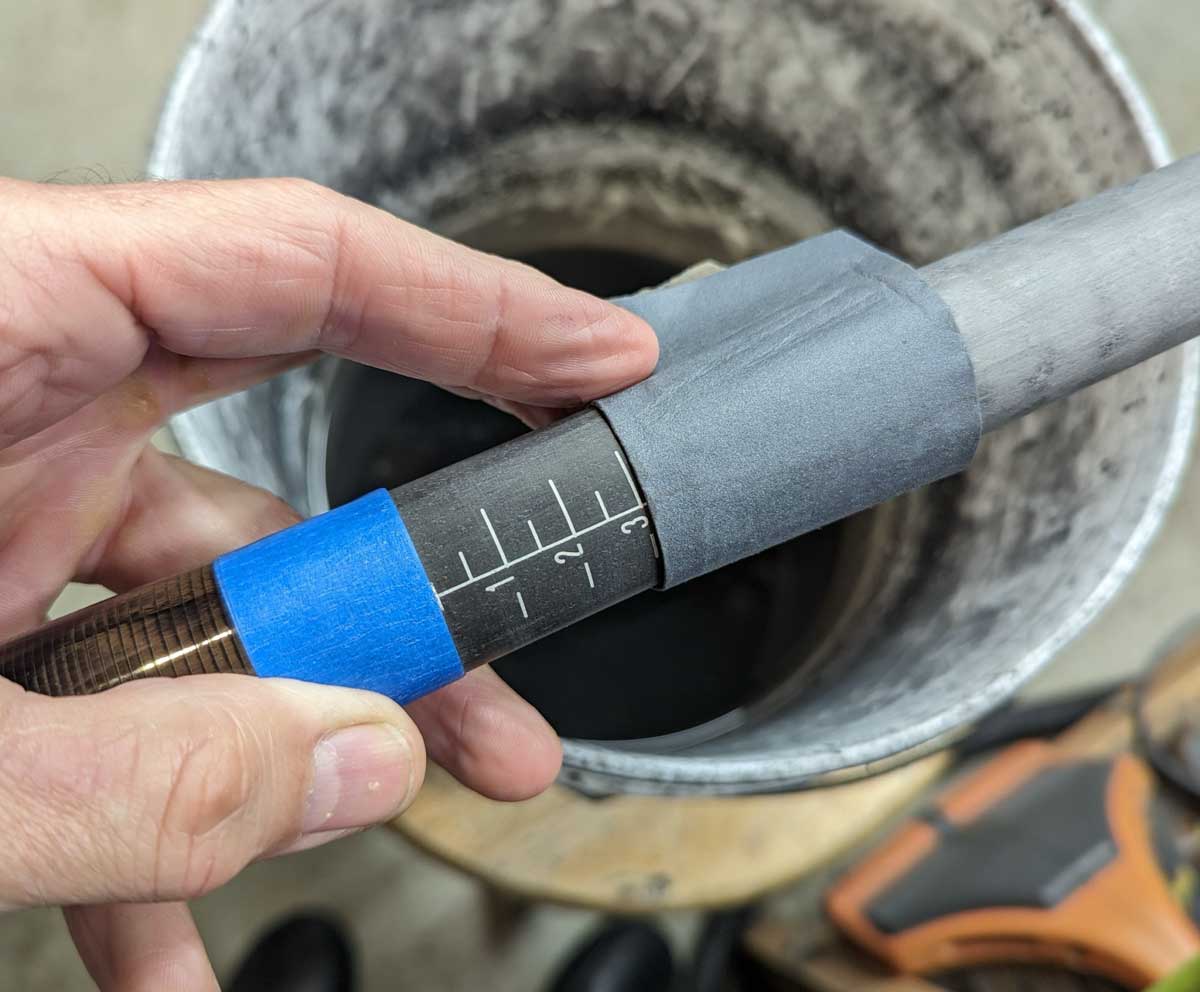
Sticky shafts need a light sanding to connect
- First thing you will want to do is put some masking tape around the transition edge just to protect that shoulder from possibly being hit by the sandpaper as I did in the picture above. (The white numbers and lines are recessed, so should not be affected by the sanding). You can see I just have the 320g folded and wrapped around the shaft.
- Wet the shaft and sandpaper. The sandpaper is dry in picture, but when doing it, I would have dipped the shaft into the water from the bucket below, and have the paper soaked. If you have not wet sanded before, this keeps the paper from clogging and gets a nice uniform sanded finish.
- You will want to go in a circular pattern around the shaft moving back and forth, then longitudinal down the shaft moving circular around the shaft. You want to keep the amount removed consistent around the perimeter. The 320 will remove just a small amount, but still good to keep checking by rinsing thoroughly then inserting into the other half of the shaft checking for tightness.
- If you have a ring, or area of scaling that is bad, you could even carefully use 220 grit just on the part with the scaling if it is taking too long with the 320. But be careful because the 220 can cut fast and make the shaft too loose and unusable.
- Once you have the shaft tuned to fit nicely in the shaft, you may have to adjust the locker lever position to tighten properly (or just tighten the screw if you have a plastic locker). You will need to play with where the lever goes over the hex shaft to get just the correct tightness of the lever when locked down.


